Seeing red? Not anymore. This no-dye red velvet cake recipe is made without food coloring for a moist, sweet Southern layer cake that lets cocoa’s natural ruddiness shine through.
This recipe was originally published in 2021, and updated September 2024.

Take it from a professional pastry chef: Yes, you can leave the food coloring out of red velvet cake.
Admission: I do not like chocolate. Never have. I held this secret shame with me throughout pastry school, when I would smile through the pain of tasting our chocolate truffles or dark chocolate mousse assignments. I became an expert in hiding my “just a sliver” slice on the plate at a birthday party. Chocolate just tastes very bitter to me. But I have two exceptions: 1) Reese’s Cups, and 2) this cake.
This No-Dye Red Velvet Layer Cake Recipe is one of my favorites: moist, full of sweet cocoa flavor and made without Day-Glo red food coloring, so the cake’s natural warm reddish-brown hue can shine.
You can make a beautiful red velvet cake without food coloring (or beets, the most common natural substitute for food dye). Read on to learn why.
This makes a wonderful birthday cake or holiday dessert, especially around Christmas. (You may also like this fudgy Chocolate Chip Pecan Pie recipe as a holiday option).
Skip the dye, up the beauty.
I know many people like their red velvet cake to be bright red. I get that; it looks fun and you know exactly what cake it is from half a mile away. That said, cutting into a real red velvet cake has always made me feel like I was committing cake murder. Think Ouiser in Steel Magnolias.
Most red velvet cake recipes use an entire bottle of food coloring. This feels less terrible if you use a natural food coloring, but standard red food dye contains ingredients like propylene glycol, FD&C reds 40 and 3, and propylparaben. Yikes. I picture these chemicals coloring my entire digestive track for days. Possibly weeks.
And for what?
The best part about red velvet cake is the velvet part, not the color. In other words, the moist cake made from buttermilk, sugar, flour, cocoa, vanilla, and eggs.
Making red velvet cake without food coloring lets the cocoa be the star. Plus, the reaction of the alkaline cocoa and baking soda with the acidic buttermilk and vinegar gives the finished cake a beautiful reddish-brown color all its own.

No-Dye Velvet Layer Cake: Recipe Notes
- This red velvet cake recipe is adapted from one of my favorite custom cake bakers, Elisa Strauss of Confetti Cakes in New York City. Elisa has some great online cake sculpting and decorating classes, and a wonderful book if you are interested in fancy cake decorating.
- Be sure to sift your cocoa. Always. Cocoa clumps in a cake batter otherwise. These clumps are virtually impossible to get out without straining the entire batter or whipping the batter on high, which is bad because it will activate gluten and make the cake tough.
- Cake flour vs. all-purpose flour. This recipe uses cake flour. Cake flour has less gluten than all-purpose flour. This makes a more tender, lighter cake. No cake flour? No problem. You can easily substitute by removing two tablespoons of all-purpose flour per cup, and replacing it with two tablespoons of cornstarch.
- How to tell when your cake is done. Baking times are always approximate. Your cake is done when it springs back when lightly touched on top, and a cake tester comes out clean.

Jump To:
Red Velvet Layer Cake: Next Steps
Now that you’ve baked your cake, here are some more useful cake tips and recipes, for your reference:
- Here is my post on how to frost and decorate a layer cake, and what tools every home baker should have to make it beautiful
- Here is my recipe for classic vanilla buttercream frosting, enough to full and coat the cake, or enough for all of the cupcakes.
- You can also decorate a sprinkle cake!
- If you are feeling a bit more ambitious, here’s the recipe for my Swiss meringue buttercream. Swiss meringue buttercream is made with egg whites and hot sugar for a fluffy, silky buttercream that’s less cloying than frosting can taste.

Did you make this No Dye Red Velvet Cake? You’ll also enjoy these other fabulous layer cakes:
- Buttermilk Birthday Funfetti Cake
- How to Decorate a Cake With Sprinkles
- The Commissary Carrot Cake
- Spiced Apple Rye Layer Cake

Velvet Layer Cake Without Food Coloring
Ingredients
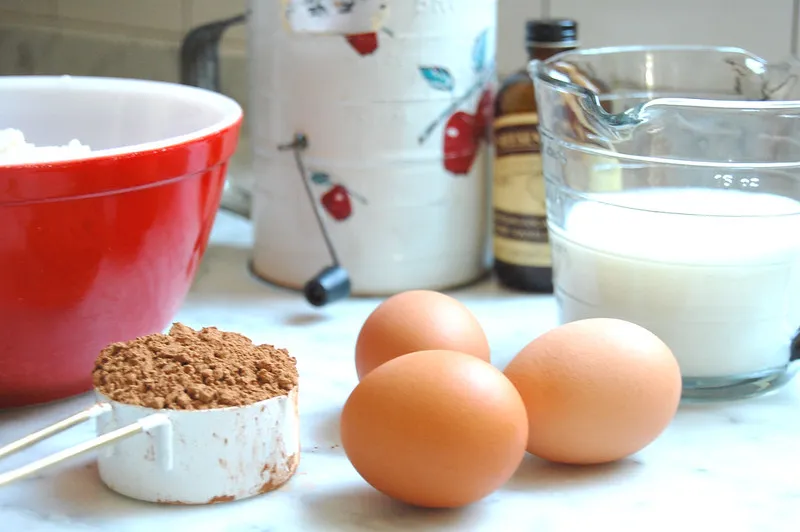
- 2 2/3 cups cake flour
- 1/3 cup cocoa powder, sifted (I like Hershey's)
- 1 teaspoon kosher salt
- 1 1/2 cups neutral vegetable oil, like canola
- 1 2/3 cups sugar
- 3 large eggs
- 2 teaspoons pure vanilla extract
- scant 1 cup buttermilk
- 1 1/2 teaspoons baking soda
- 2 teaspoons white vinegar
- 1/4 cup cold water (or food coloring, if you must)
- Buttercream frosting, to decorate (recipe follows)
Instructions
- Preheat the oven to 350°F and grease two 9" cake pans and line the bottoms with parchment paper, or line muffin tins.
- Sift together the cocoa powder, flour, and salt and set aside.PRO TIP: You must sift the dry ingredients, especially the cocoa powder. Cocoa powder, if left unsifted, will clump in the batter.
- In the bowl of a large mixer fitted with the paddle attachment, beat the oil and sugar on medium until fully mixed and lightened slightly in color. Lower the mixer to low and add the eggs one at a time, then the vanilla. Add each egg when the previous one is almost fully mixed in. Scrape the bowl and beat on medium until everything is fully emulsified and smooth.
- With the mixer on low, alternately add the flour/cocoa mixture and the buttermilk in two additions each: flour, buttermilk, flour, buttermilk. Scrape the bowl and mix again on low until everything is emulsified.
- In a small bowl, whisk together the baking soda and white vinegar. It will sizzle like a mini-volcano science experiment. Add this to the cake batter with the 1/4 cup water (or food coloring, if using) and mix on medium speed for about 10 seconds to fully combine. Scrape the bowl.
- Divide the cake batter evenly between the cake pans or muffin tins and bake on the center rack until done, about 25 to 35 minutes for 9" cake layers, and about 18 to 20 minutes for cupcakes.
- Let cool in the cake pans until you can handle them without an oven mitt, but are still warm. Turn out onto cooling racks, removing the parchment from the bottom of the cakes, and cool fully before eating or decorating. PRO TIP: The best way to remove cakes from a cake pan is to run a small offset spatula around the edges first, with the front of the spatula facing outward so it does not accidentally cut into the cake. I like this Ateco one, and find it indispensable.
- To layer and decorate you cakes, use this recipe for classic vanilla buttercream frosting, or whip up a Swiss meringue buttercream.
Notes
Nutrition
Disclaimer: Nutrition information is provided for courtesy purposes only, and is an estimate not verified by medical or nutrition experts. Read the full nutrition disclaimer.


92 comments
Sandra
I made this last year for an employee’s birthday and she loved it so much I’m about to do it again. It will not be vibrant red, but it will be reddish brown if you use the exact ingredients. You’re not going to get anything super bright red unless you use dye. If you searched for a recipe without food coloring I’m guessing you don’t want it in there. Next time I will try a little beet powder, but I’m worried about it overpowering the taste so that one will be for everyone at home to try first lol. Thank you!
Lucy
I used organic natural cacao powder and it was not red at all. Good chocolate cake as others have mentioned, but not red velvet.
Maddy
Not red or rustic at all.. Just brown, looks and tastes like regular chocolate cake.
Disappointing. Nothing “red” about it.
Good chocolate cake recipe, though.
Jj
This is is probably because you used a dutch processed or alkalized cocoa powder. They will not react to the acid by turning red like natural cocoa does
Lisa Ruland
Sorry you wanted something more vibrant! This is all about keeping it natural and eliminating the dye, which gives it a more natural color. That said, I am glad you liked the flavor.
Sarah
Can this recipe be used to make cupcakes instead of a big cake? Any suggestions on baking temperature or time?
Lisa Ruland
Absolutely, Sarah! You can bake them at the same temperature. Cupcakes generally take about 20-25 minutes to bake, or until a cake tester comes out clean and the tops feel springy. Enjoy!
Amy
I made this for my father-in-law’s birthday, and paired it with ermine frosting. I used 1/3 butter, in which case, I recommend reducing (or perhaps even omitting completely) the water, as butter has water in it while oil does not. My cake deflated a bit in the center, and I think had I used no water with the butter, I would have had no deflation. Going to try this again without water this time. Excellent flavor otherwise!
Makayla
Is cake flour necessary, or can it just be regular flour? Is cake flour something you recommend in all cake recipes, or is it something that adds to a red velvet cake specifically?
Lisa Ruland
Great question, Makayla. Cake flour makes a very tender cake because it has less gluten, which causes chewiness. I like cake flour for many cakes, but all-purpose flour will work fine as long as you do not overmix the batter. You can also make cake flour by removing one tablespoon of flour per each cup, and replacing it with cornstarch. Hope this helps, and happy baking.
Makayla
Thank you so much for explaining that to me! I hadn’t noticed the explanation above, but your explanation helps a lot! Thank you!
Lizzie Speir
Can you use butter instead of the oil and if so, how much would you need?
Lisa Ruland
Hi, Lizzie! In theory, yes, you could use melted clarified butter in the same quantity. The cake may taste extra rich, which could be a good or bad thing, depending!
Arlene Sterner
Can this be made in a 9 x13 cake pan?
Lisa Ruland
Absolutely!
Linda
I would very much like to make this as a 3 layer 8 inch pans will this recipe work for that
Lisa Ruland
Hi, Linda! Hope you enjoy the cake. You can certainly bake this in three 8? layers. The baking time will reduce by about 20% or so, but keep an eye on it. As one of my chef instructors would say in pastry school, “it’s done when it’s done.” You can also increase the recipe by half if you want very high 8? cake layers. Just don’t fill each cake pan more than 2/3 full, as it will rise. Happy baking!
Linda M hughes
looks delicious i very much like the idea no red food coloring I would very much like to make this as a 3 layer 8 inch round is there a breakdown of ingredients for a 3 layer
Lisa Ruland
Hi, Linda! Hope you enjoy the cake. You can certainly bake this in three 8″ layers. The baking time will reduce by about 20% or so, but keep an eye on it. As one of my chef instructors would say in pastry school, “it’s done when it’s done.” You can also increase the recipe by half if you want very high 8″ cake layers. Just don’t fill each cake pan more than 2/3 full, as it will rise. Happy baking!