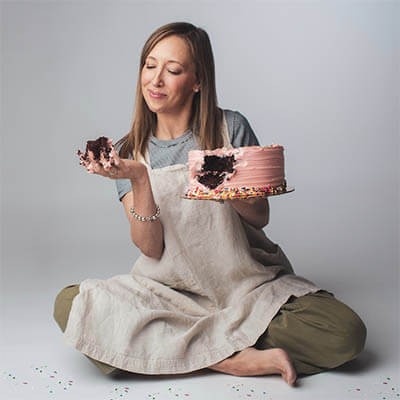
You can bake a cake. Now learn to frost and decorate it.

Speaking anecdotally, I think that virtually all home bakers wish they could decorate a cake as well as they bake one. After all, we eat first with our eyes, and any layer cake baked from scratch deserves oohs and ahhs — not oops and oh-nos. Bakers deserve to know how to frost and decorate a cake. All you need are a few simple techniques and tools. And practice.
Simple cake frosting and decorating methods do not really special skill (think open-sided “naked” cakes or thick buttercream swirls made with the back of a spoon). But what if you want to create a more professional-quality cake with straight sides, an even top, and smooth buttercream? You can do it.
You’ll also like: Buttermilk Birthday Sprinkle Cake and How to Decorate a Sprinkle Cake

How to Frost and Decorate a Cake, Step One: Have the Right Tools
Invest in a few inexpensive tools now, so they can improve your decorating skills forever. You can’t sautée vegetables without a pan, and you can’t frost a layer cake without an offset spatula. Here is what you really need to do it right:
- A multisided cake smoother or comb
- Offset spatulas: Small and Medium
- Cardboard cake rounds in the size of your cake pans
- A cake turntable, such as this Ateco heavy-duty one (which pros use) or this less-expensive option
- A long, serrated knife, like a bread knife
These cake tools are cake decorating-specific, and do not include materials you will need to make the buttercream or cakes.

Step Two: Build The Cake Layers Up Right.
The first step is to have ready your room-temperature (never warm) cake layers and your buttercream or frosting (or icing in some parts of the country). From there:
- Put your first layer of cake on the turntable. Using the serrated knife and rotating the cake as you go, cut off the domed top of the cake so that you have a flat, even layer. Discard (or snack on) the domed top. Repeat with the additional layers, and set aside.
- Put a damp square of paper towel on top of your turntable. The paper towel holds down the cardboard cake round with the cake and prevents it from sliding around.
- Tape together two cardboard rounds. Use two instead of one because it adds a little height to the cake, as well as stability since cake is heavy.
- Put a blob of buttercream on the top of the cardboard rounds. This will act as glue when the cake goes on there. Place your first cake layer on the cardboard round, and make sure it’s perfectly even with the sides of the cardboard. Place the cake on the turntable. You’re ready to add buttercream.

Step Three: Layer the Cakes with Buttercream.
- Put a generous blob of buttercream in the center of your cake layer. Use the back of your large offset spatula to spread the frosting back and forth from the center, going just to the edge of the cake. Rotate the cake as you go.
- Add the second cake layer on top of the first, but place it upside-down on the buttercream, so that the bottom of the cake is on top. This is for two reasons. One, it prevents a brown streak inside the cake. Two, it creates a perfectly flat, relatively crumb-free top to your cake.
- Now, repeat: Put a generous blob of buttercream in the center of your cake layer. Use the back of your large offset spatula to spread the frosting back and forth from the center, going to the edge of the cake. Rotate the cake as you go. Get eye level with the cake to make sure that everything looks even.

Step Four: The Tricky Part!
Frosting the sides with buttercream are the hardest part. But you can do it!
- Just like before, put a nice blob of buttercream on the entire side of the cake. Then use the back of your large offset spatula to spread it over a section of cake. Rotate the cake turntable do do this; don’t just use the spatula. Repeat until the entire side of the cake is covered fully, cleaning off the back of your offset spatula each time you add new buttercream to remove any crumbs.
- Get down at eye level with your cake and give it a spin. Fill in any areas that have thin or crooked buttercream. You may notice that some of the side buttercream has built up higher than the top of the cake, and that you have to clean up the edges. To do this, start off the cake and use the clean back of your offset spatula to bring it in for a “landing” on the cake like an airplane. Then lift off again. Turn the cake a bit and repeat, going all the way around.
- Chill the cake for 15 to 20 minutes.


Finish and Decorate
Remove the cake from the fridge. The buttercream frosting should have stiffened a bit. This makes the cake easier to work with. Go back over the top and sides of the cake, evening things out and covering any thin spots.
If you want to create a textured side for your cake, hold your cake comb perpendicular to the cake and gently spin the cake around while holding the comb in place.
The good news: Decorations hide imperfections and draw the eye to the “good” parts. Use simple cake decorations like fresh organic flowers, fresh berries, sprinkles, or other ingredients like crushed nuts or coconut (depending on the recipe) to zhuzh up your cake. Even candles can be enough.
A final tip for when you frost and decorate a cake: Know when to stop. Do not drive yourself insane perfecting the buttercream. Likewise, do not add too much “stuff.” Cakes can easily get overdecorated. Add enough décor to make it look fun and special, without being overloaded.


9 comments
Grayson
Do I need to heat the icing to get
The right consistency for easier spreading?
Unpeeled
You really just need it to be at a room temperature (though not too cool of a room temperature). Leave the butter out to come to room temp before making the frosting so it’s smooth. Heating icing very much risks melting it, which will be greasy and deflate all the aeration.
Jaynie
Sorry, Do any brand of sprinkles work in the cake?
Unpeeled
If you’re adding sprinkles into a cake batter, like for a confetti cake, use the longer, standard-size sprinkles as opposed to the tiny dot sprinkles. (I wish I knew the official names, but hopefully that makes sense.) I like the slightly longer ones for decorating as well, since the tiny ones tend to scatter all over!
Jaynie
Are any brand of sprinkles work in the cake?
Unpeeled
Yes! Any brand should work. I just buy whatever is at the supermarket. Happy baking!
Jaynie
Your cakes are beautiful. I have a hard time making them look profession, like sharp edges. Do you have a suggestion?
Unpeeled
Hi, Jayne. This is a great question. The answer really comes down to two things: the right equipment, and practice. To get the sharp edges, you will need a turntable, straightedge (such as a clean ruler or offset spatula), and cake layers that have had the dome cut off. Put the top layer face-down so that there are fewer crumbs on top. After that, it’s practice, practice. Hold your straightedge level, and when doing the top, peel off like an airplane taking off–don’t let your straightedge dip down at the end. YouTube probably has a few very good tutorials. Good luck!
Zachary
YES!!!!! I never knew how to decorate very well, i love making cakes, but the decoration parts always got me thank u