The Libby’s pumpkin pie recipe is iconic, with perfect sweet, spiced flavor. But if you follow the can directions, you’ll end up with a soggy crust and possibly a crack in the top. No more! Tweaking the baking method guarantees a custardy, delicious pie with a crisp, golden crust and a smooth custard filling with no crack. Here’s how to make Libby’s pumpkin pie, better.
Jump To:
Why Libby’s Pumpkin Pie Recipe (With a Slightly Different Baking Method) Tastes Best
If you’ve ever made the Libby’s pumpkin pie recipe straight from the can directions, you already know the truth. The rich, sweetly-spiced pumpkin flavor is 10/10. But the crust? It’s often pale, soft, and damp on the bottom. Moreover, there’s often a slight crack in the center.
Both issues come from the same problem: the original instructions bake a liquid custard at a high temperature inside a raw crust. That combination all but guarantees a soggy bottom and a cracked, over-baked top.
I get it. The good folks at Libby’s no doubt recognize that bakers are busy, especially at Thanksgiving, and the original baking method is 1) easy, and 2) faster. But there’s a tradeoff in the quality of the result.
Get the full roundup of all the Best Thanksgiving Desserts.
The Simple Fix: Pre-Bake the Crust and Lower the Oven Temperature
My background as a professional pastry chef, trained at the Culinary Institute of America, shaped my twofold approach here:
- Pre-bake the pie crust. This makes it crisp and provides a barrier against the liquid filling.
- Lower the oven temperature and bake it longer. Custards turn out best when baked low and slow so the proteins set gently instead of tightening into cracks.
This version keeps the classic Libby’s flavor everyone loves. It simply uses correct custard technique and the pre-baked crust the original recipe should have included all along. I’ll bet you a turkey leg that this Libby’s pumpkin pie recipe will be better than the original, with the exact same, beloved flavor. Here’s the perfected recipe.
In pastry school, we learned in no uncertain terms that, sure as the sun rises in the east, custard tarts and pies must be baked in a par-baked shell, and not a raw one. The reason is obvious: raw custard is a liquid. That liquid will soak into the raw crust and prevent it from even remotely browning.
Want some more seasonal desserts perfect for fall, Thanksgiving, or Christmas holidays? You’ll love my five-star Thanksgiving Cake recipe and this Easy Apple Crisp With Oat Topping. And this French Apple Custard Tart recipe combines seasonal apple flavors and a sweet custard.
What You Need to Make the Libby’s Pumpkin Pie Recipe on the Can
This recipe keeps the original Libby’s ingredients and proportions. The filling is unchanged. The spices are unchanged. You can still use store-bought or homemade crust. The only adjustment is the better method, which we’ll cover below. You will need:
For the Filling
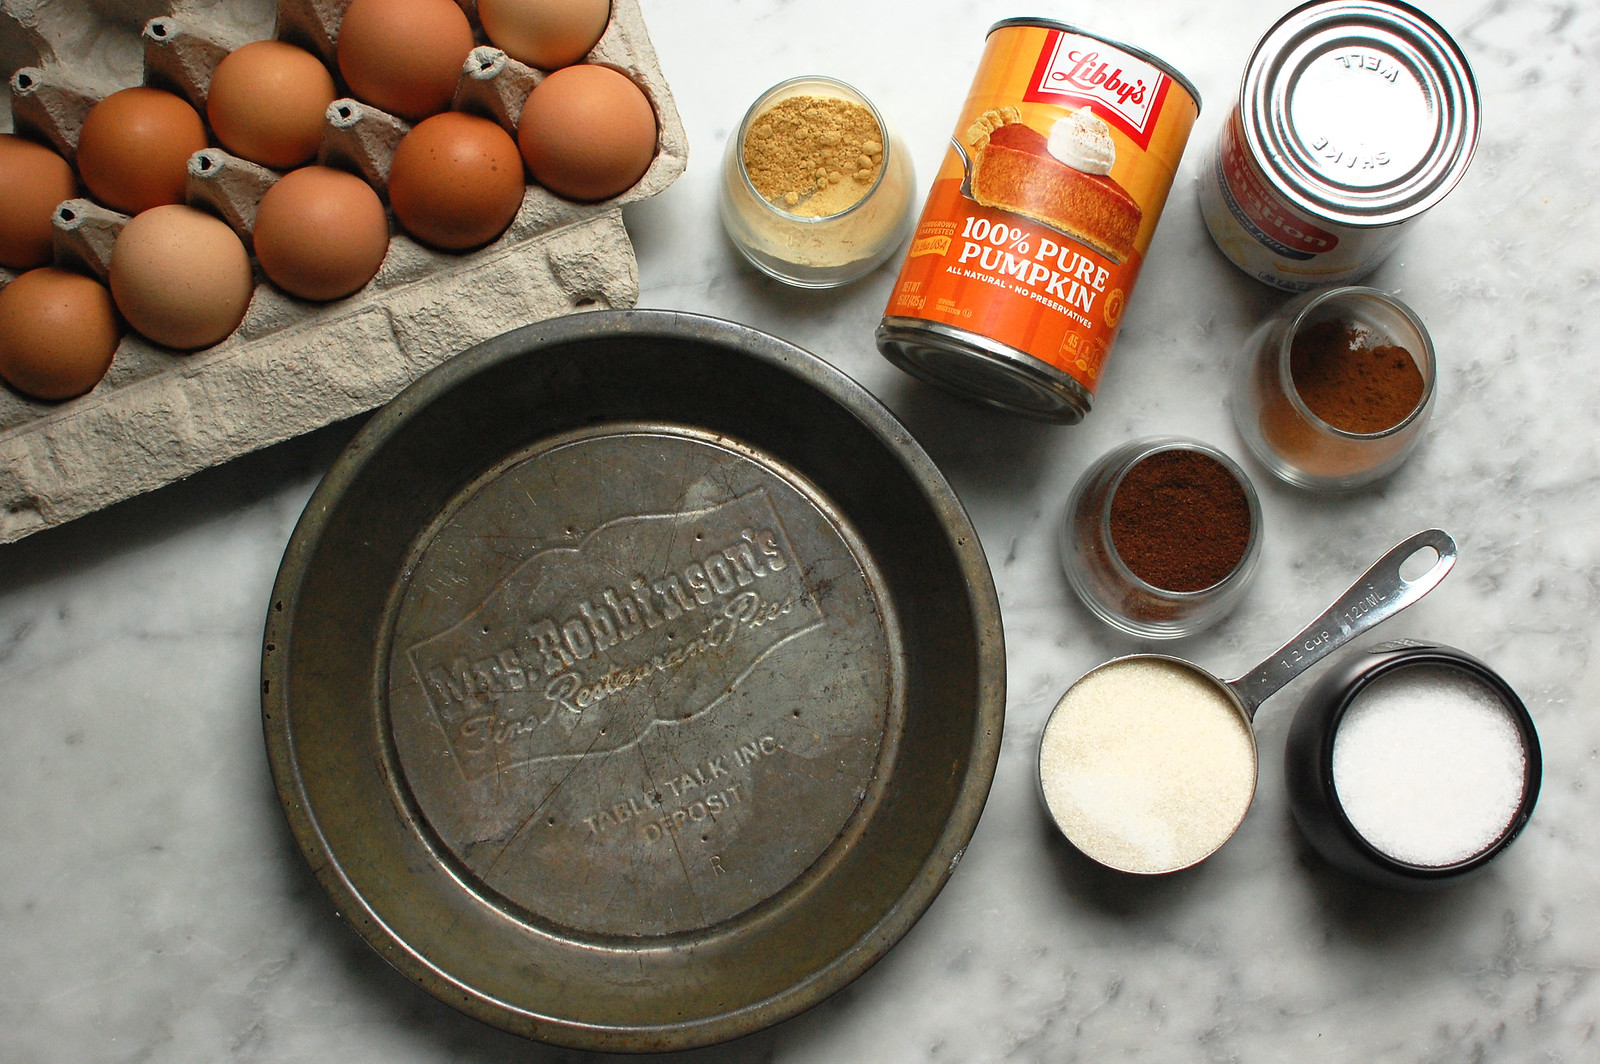
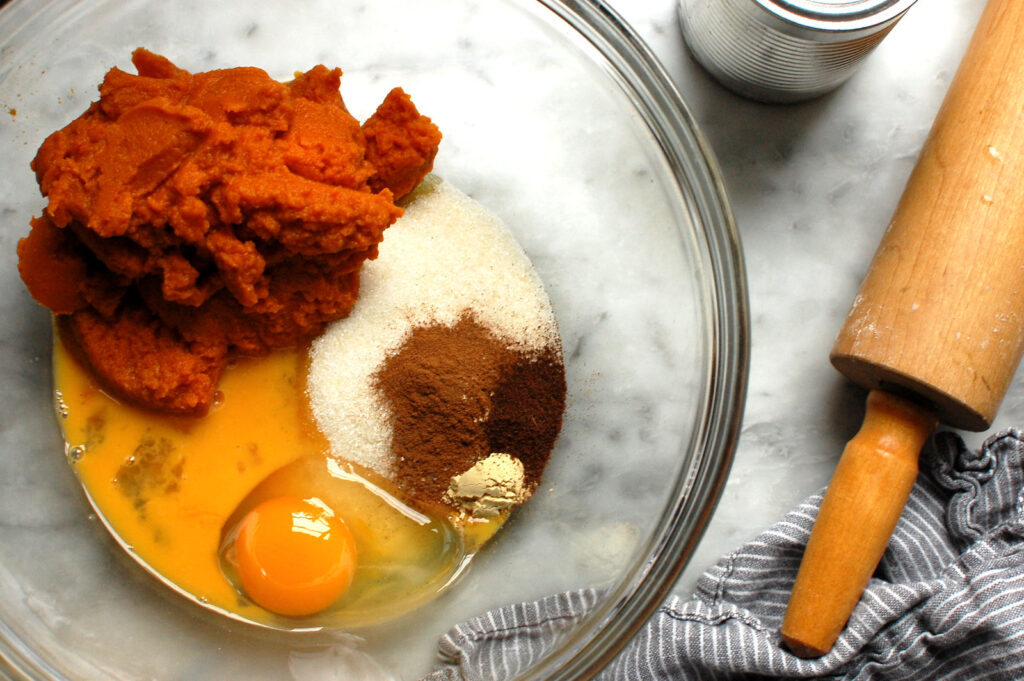
- 1 can (15 ounces) Libby’s 100% Pure Pumpkin
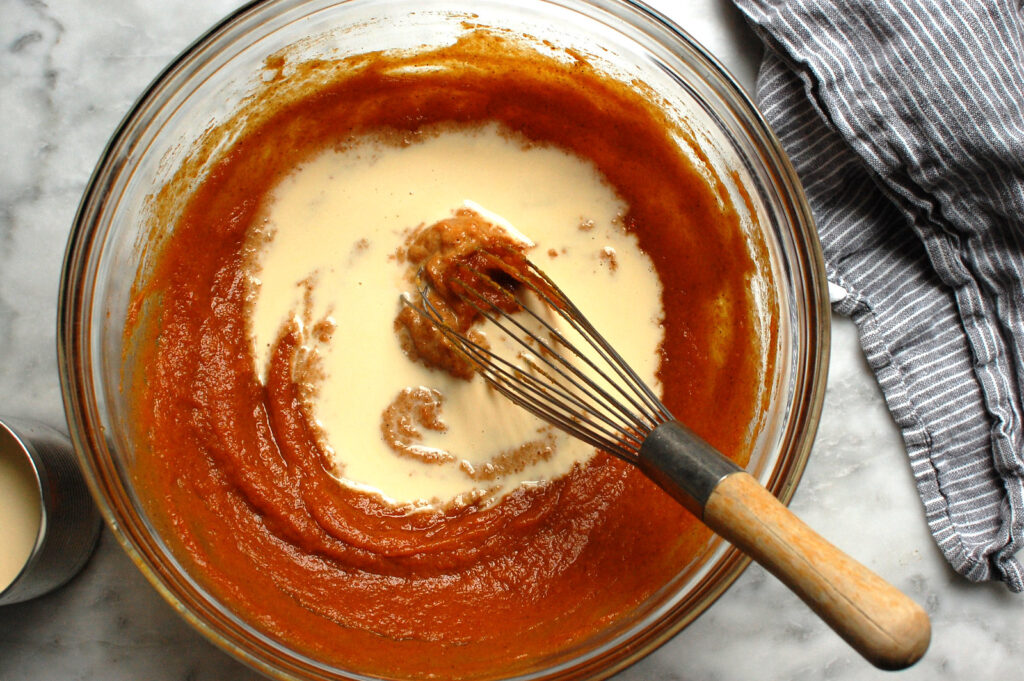
- 1 can (12 ounces) evaporated milk
- 3/4 cup granulated sugar
- 1/2 teaspoon salt (I use Diamond Crystal kosher salt)
- 1 teaspoon ground cinnamon
- 1/2 teaspoon ground ginger
- 1/4 teaspoon ground cloves
- 2 large eggs
You can also flex a can of pumpkin with this simple, lovely Pumpkin Butter recipe.
For the Crust
- 1 unbaked 9-inch pie crust (homemade pie dough or store-bought), cold
- My new addition: one egg for egg wash
Additions and Substitutions
- The only addition here is the egg wash for the pie crust. This helps create a barrier against the liquid custard when it’s poured in and baked.
- The best eggs substitute? Whisk together 2 tablespoons ground flaxseeds with 6 tablespoons water in a bowl. Let it sit for about 20 minutes, until thickened. Note: Only do this for the custard; it is not a replacement for egg wash–just skip that part.
- More baking spice: The balance is pretty much perfect as written, but an extra 1/8 teaspoon of cinnamon and ginger would be fine if you want a more fragrant, spiced version. Do not increase the cloves, which has a very strong flavor.
- Changing the type of crust: A chocolate wafer crust (like in this Pumpkin Swirl Cheesecake) or graham cracker crust (see this Cranberry Curd Tart recipe) makes a great substitute for plain pie dough.
How to Make This Recipe

Here’s how to make the Libby’s pumpkin pie recipe, but with the better directions for baking:
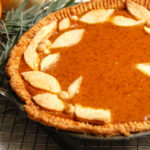
- Prepare your pie dough and roll to 1/8″ thick. Drape the pie dough into a 9″ deep-dish pie shell. Trim the edges.
The rolled dough should be about 10″ to 11″ in diameter. If using a chilled, pre-made pie dough, proceed to step three. Be sure the pie dough is fully chilled before baking.
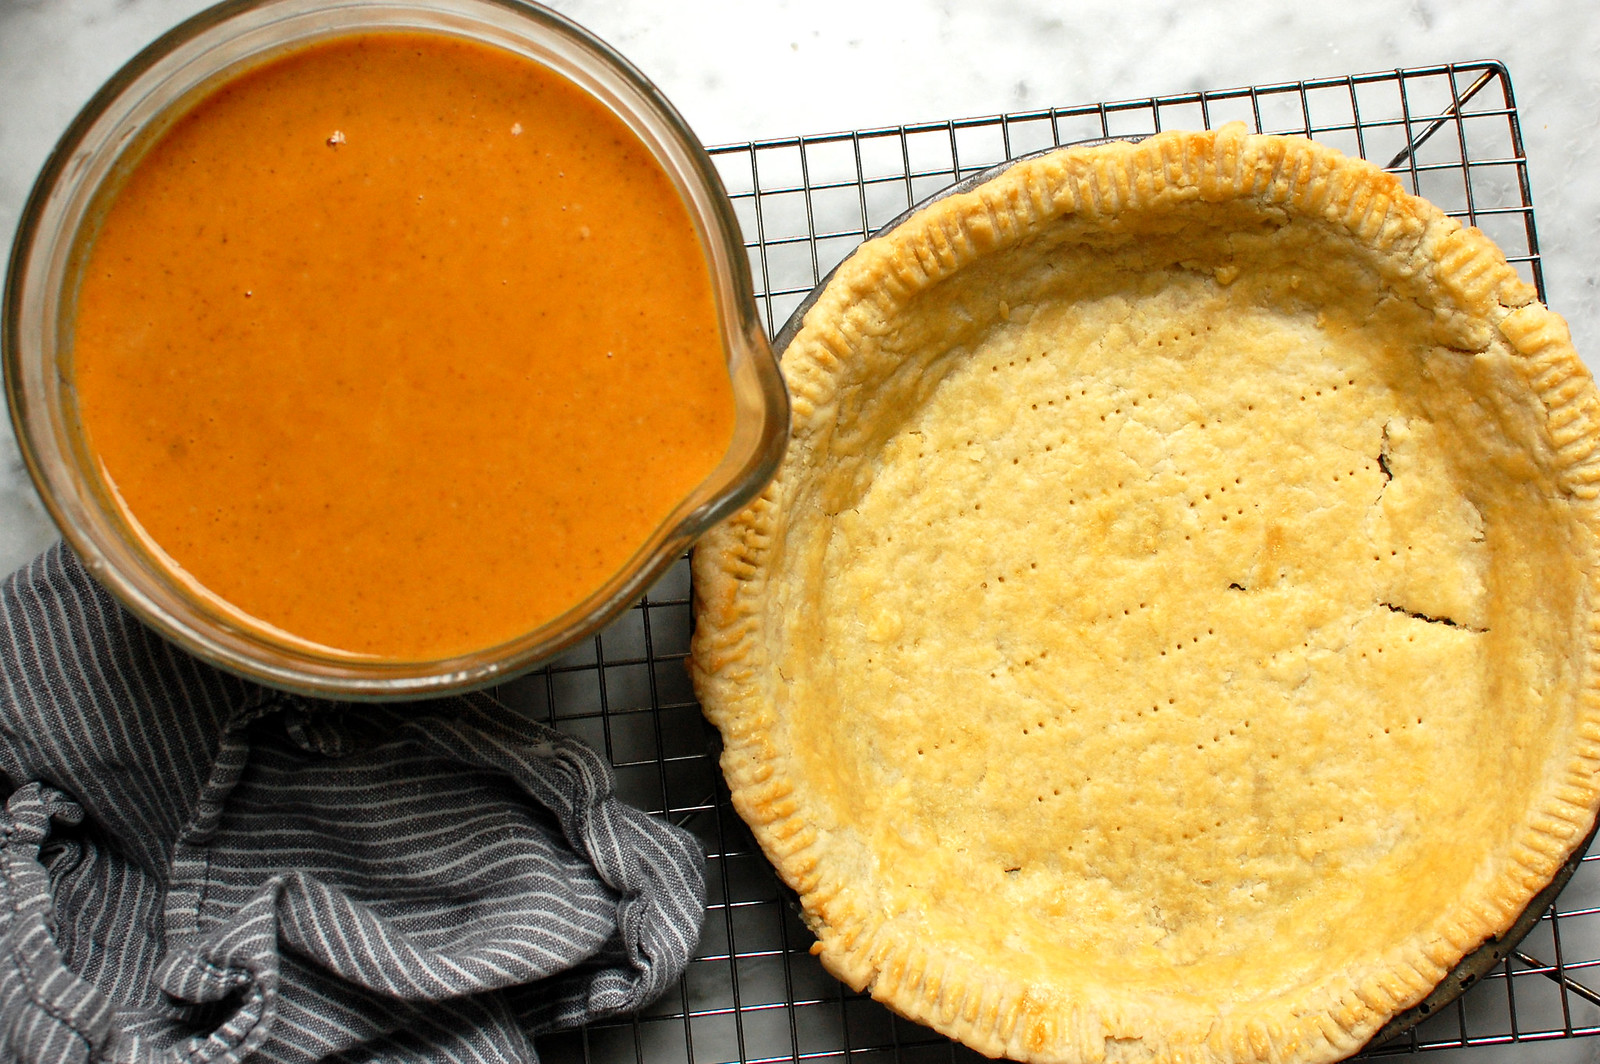
- Par bake the pie dough.
Preheat the oven to 325°F. Dock the crust with a fork and lightly egg wash the surface with a pastry brush. Bake the pie shell on the center rack of the oven for 25 to 30 minutes. Cool to room temperature
- Make the custard filling.
Raise the oven temperature to 350°F. Mix together the pumpkin purée, sugar, salt, cinnamon, ginger, cloves, and eggs. Slowly whisk in the evaporated milk and mix until everything is emulsified.
- Pour the pumpkin filling into the par-baked pie shell and bake.
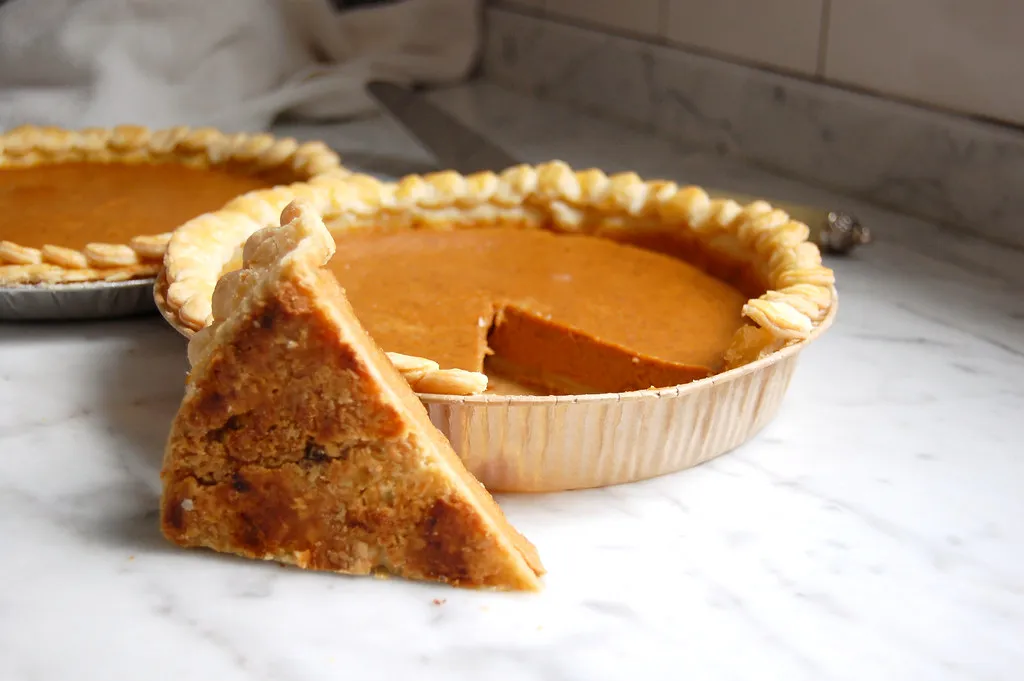
Bake for 50 minutes to one hour, or until the pie does not jiggle in the center. Let cool fully before serving. Serve with whipped cream or vanilla ice cream.
Make-Ahead Tips
The baked pumpkin pie can be made up to two days in advance and stored in the refrigerator, uncovered to prevent condensation from forming on the surface.
Making the pie dough in advance: The pie dough can be made, rolled out, placed in the pie plate, and chilled in the refrigerator, covered, up to three days in advance.
Making the pumpkin custard in advance: The custard can also be made up to three days in advance and stored in an airtight container in the refrigerator. Give it a good stir before pouring it into the pie shell right before baking.
Do not pour the custard into the pie dough until you are ready to bake the pie.
Want a delicious, savory dinner recipe using canned pumpkin? I love this Pasta With Creamy Pumpkin Sauce. It’s fabulous. And for another good Thanksgiving dessert pie, it’s gotta be this gooey Chocolate Chip Pecan Pie recipe.
F.A.Q.s and Expert Tips About Making Libby’s Pumpkin Pie
The original recipe pours liquid filling into an unbaked crust, which allows moisture to seep in before the dough sets. Blind-baking the crust first creates a barrier, keeping it crisp and sliceable.
Over-baking is the main culprit. Pumpkin custard is delicate. Bake it lower and slower than the original, remove it when the edges are set but the center jiggles very slightly, and it will finish firming as it cools.
Absolutely. Both work fine, just make sure to chill and blind-bake it before adding the filling. For extra guidance, you can look at our Pie Dough 101 tutorial.
Yes. Libby’s 100% Pure Pumpkin consistently beats out the competition in flavor and texture, and matches the classic recipe perfectly. If you can’t find Libby’s, though, any 15-ounce can of plain pumpkin purée will work.
Refrigerate covered for up to three days. For longer storage, freeze in an airtight container or wrapped in plastic wrap for up to 2 months and thaw in the fridge.
More Perfect Pumpkin Recipes You’ll Enjoy
- Moist Pumpkin Pecan Bread
- Pumpkin Donut Muffins Rolled in Cinnamon Sugar
- Pumpkin Buttermilk Biscuits
What is your favorite Thanksgiving dessert? Share in the comments, below.
Libby’s Pumpkin Pie Recipe (No Soggy Crust Method)
Ingredients
Pie Shell
- 1 chilled, single 9" pie dough, homemade or store bought (recipe below)
- 1 egg, beaten
Pumpkin Pie Filling
- 1 15-ounce can pumpkin puree
- 3/4 cup sugar
- 1 teaspoon cinnamon
- 1/2 teaspoon ground ginger
- 1/4 teaspoon ground cloves
- 1/2 teaspoon salt (I use Diamond Crystal kosher salt)
- 2 large eggs, beaten
- 1 12-ounce can evaporated milk
Instructions
For the Pie Dough
- If using a store-bought pie dough, proceed to step 4. If using homemade pie dough: Make enough dough for a single, 9" pie crust. Pat into a flattened round, and chill for at least one hour, covered in plastic wrap. Lightly dust the countertop and both sides of the pie dough with flour. Roll out the chilled pie dough to 1/8" thick. (The rolled dough should be about 10" to 11" in diameter.)PRO TIP: You can make the pie dough up to two days in advance and store in the fridge, wrapped. If the pie dough is very cold and will not roll easily, tenderize it by banging it solidly with the rolling pin.
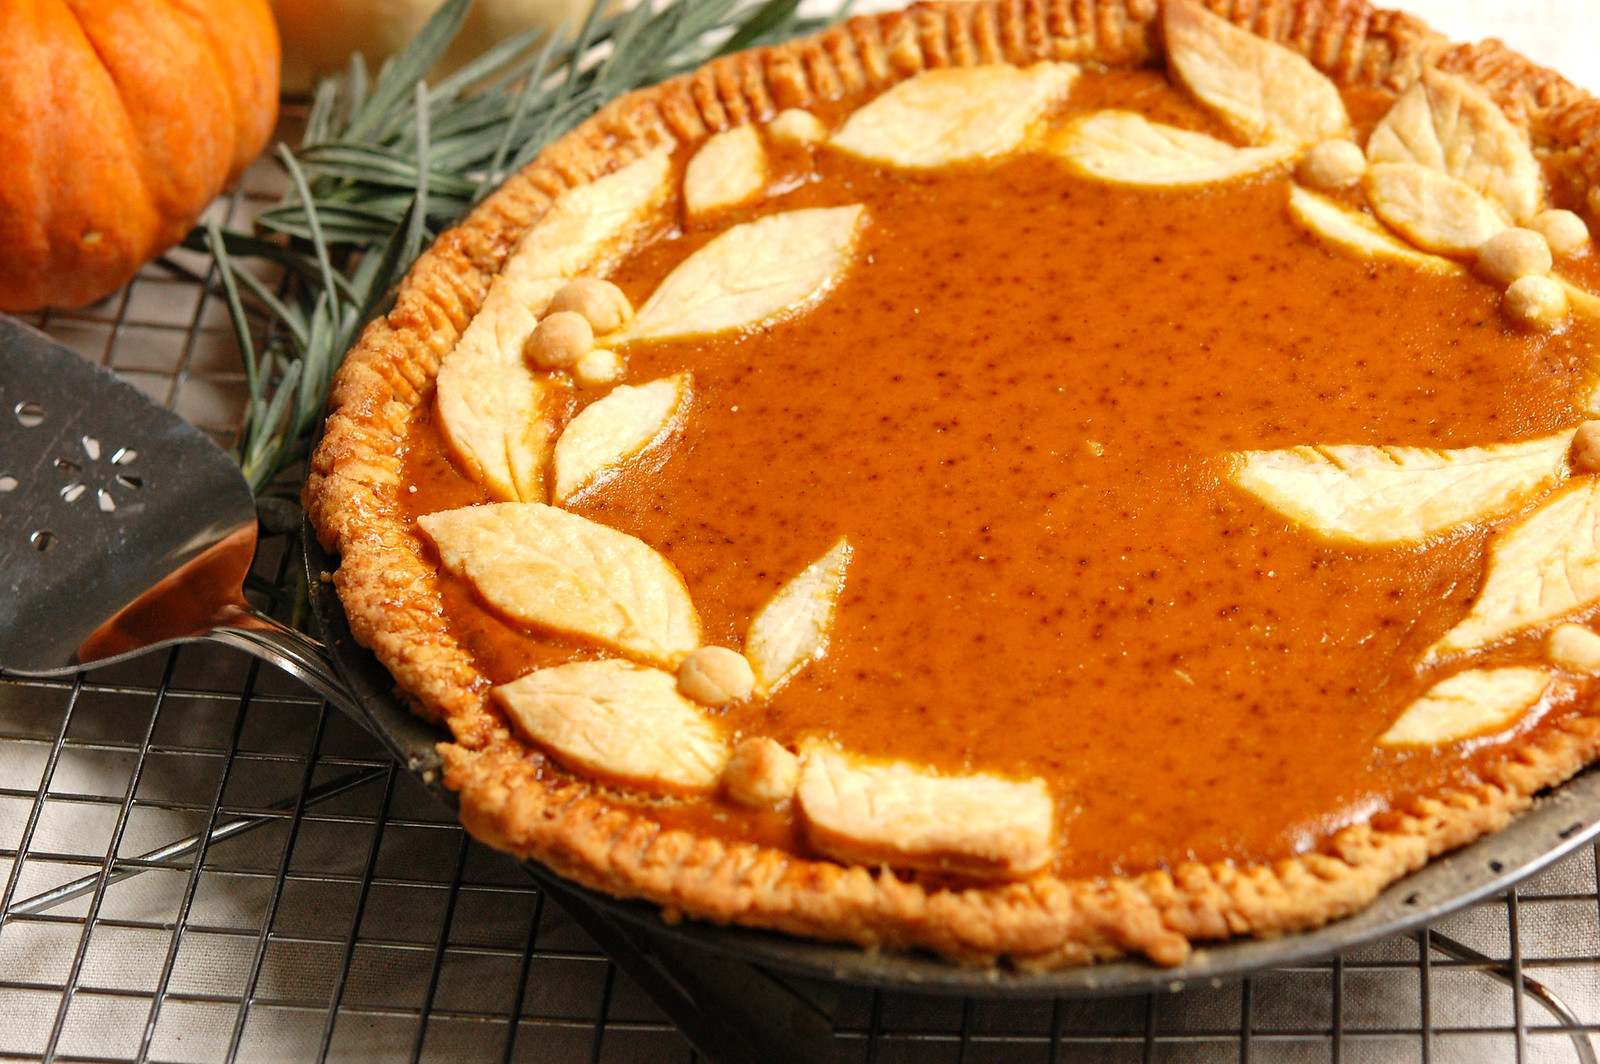
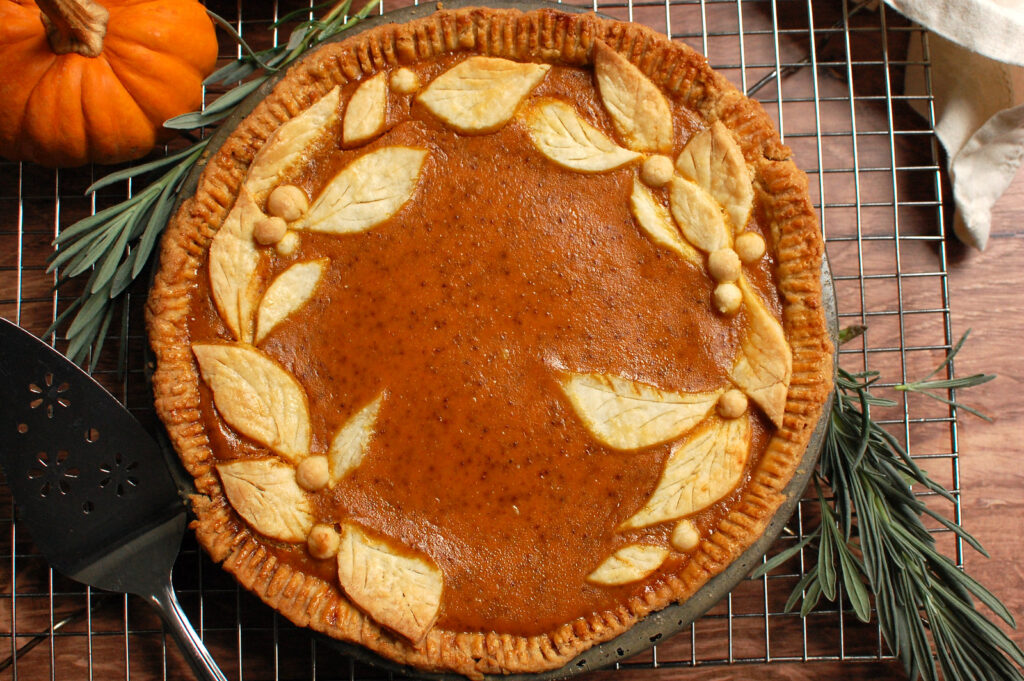
- Gently drape the pie dough into a 9" deep-dish pie shell. Trim the dough so that an even 1/4" lip hangs over the rim. Pro tip: You can gather and re-roll the pie dough scraps and cut them into decorative leaves or shapes for the top of the pie. Otherwise, discard.
- Loosely cover the pie dough with plastic wrap and chill for 1 hour, or overnight. This relaxes the gluten to ensure it won't shrink when baked.
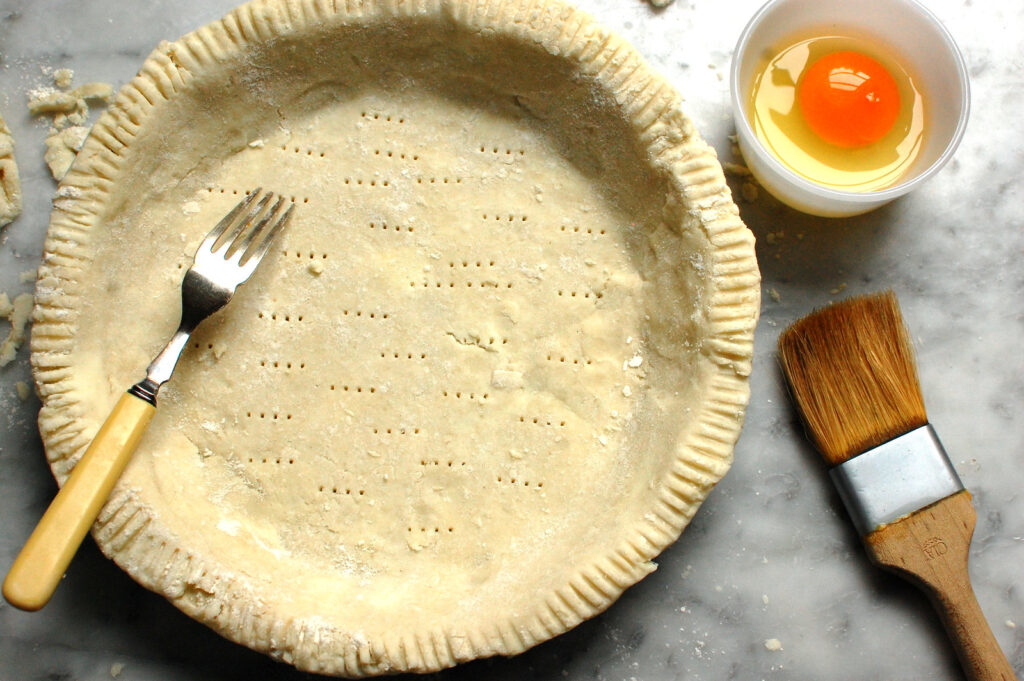
- Preheat the oven to 325°F. Remove the chilled pie dough from the fridge. Prick the base of the chilled pie dough with a fork all over. PRO TIP: Pricking the bottom of the pie dough with a fork (called "docking") helps air escape during baking, preventing large bubbles in the pastry.
- With a pastry brush (or your fingers in a pinch), lightly brush the surface of the pie shell with the beaten egg, getting the bottom and sides. You won't use all of the egg.
- Bake the pie shell on the center rack of the oven for 25 to 30 minutes. It will still be pale, but partly cooked. It should have a dry appearance. Cool on a wire cooling rack to room temperature.
For the Pumpkin Pie
- Raise the oven temperature to 350°F. In a large mixing bowl, whisk together the pumpkin purée, sugar, spices, salt, and eggs. Slowly whisk in the evaporated milk until smooth.TIP: The pumpkin pie filling can be made while the crust is par-baking.
- Pour the pumpkin custard into the par-baked pie shell. You may not use all of the filling depending on the depth of your pie plate. If using, egg wash your decorative pie dough scraps, and gently arrange over the custard. They should float.
- Bake for 50 minutes to one hour, or until the pie is firm but ever so slightly jiggly in the center. It shouldn't slosh or appear runny. Cool on a wire rack for two hours, then serve or refrigerate, uncovered. Serve plain or with whipped cream or vanilla ice cream.
Notes
Nutrition
Disclaimer: Nutrition information is provided for courtesy purposes only, and is an estimate not verified by medical or nutrition experts. Read the full nutrition disclaimer.


18 comments
Mrs. L.
Hi, Lisa. This was very well received this past Thanksgiving, and I definitely noticed the improved crust texture. Thank you. I will do this from now on. A question: Do you think there is a difference whether you bake in glass or metal? Thank you.
Lisa Ruland
Hi and thanks for the note and great question. The answer is yes! Metal always bakes the best, crisp crust because metal conducts heat the best. Glass comes in second. I always avoid baking pies in paper or silicone molds. They are least likely to brown, and are also flimsy which could crack the crust.
Evangeline
The crust was actually crisp! Tasted wonderful. My crust shrunk a llittle but it was my fault, I think, for not chilling the dough before I prebaked the shell (I was rushed for time). The texture was much better than the usual Libby’s method, but the taste was still the same. Thank you for the great tip.
Barbara
Hello Lisa!
( BIG fan here)… many recipes will call for blind ( par) baking of pies and tarts but few suggest the egg wash before baking. Do you always use an egg wash on all your par- baking??
(Using sooo many of your recipes for this season’s holiday gatherings! Serving your Confetti cake for hubby’s 70 th on Thanksgiving Day —( along with pumpkin and apple pies, of course!). Many thanks!
Lisa Ruland
Hi, Barbara! Thanks for the kind note and the good questions. I do not use an egg wash on all of my par-baked pie doughs, but I do when the filling is especially creamy. Pastry school trick 🙂 It adds a barrier between the dough and the filling to give it a little extra guarantee of crispness. That said, by far the most important part is cooking the dough until it’s golden brown before adding the filling. I hope you enjoy a wonderful holiday and good food.
Julie
Hi Lisa!
Thanks so much for this recipe ! It is perfection !
Happy Thanksgiving !
Unpeeled
Fantastic! So glad it worked out. My favorite 🙂
Lynn
I would like to try the par-baking technique but I’m curious about the oven temp. Your instructions say to raise the oven temp to 350 for baking the pie with the filling, but what is the temp for par baking the crust? I couldn’t find it in the recipe. Thanks so much for the helpful pie tips!
Unpeeled
Hi, Lynn! Great catch! I realized that I accidentally deleted that (very important!) information when I edited something. The temperature for par-baking the pie shell should be 325 degrees F. I added it back into the directions. My apologies, and happy baking.
Lynn
The crust was crisp and flaky. Just perfect.! I also used the same technique for my pecan pie recipe. The best ever! Thanks!
Unpeeled
Fantastic! I’m so glad to hear it.
Deb
Hi
I do not see what temp the crust should be baked at before raising temp to 350 with filling.
Help!!!
Deb
Unpeeled
Hi, Deb! Ack!! So sorry. I realized that I accidentally deleted that (very important!) information when I edited something. The temperature for par-baking the pie shell should be 325 degrees F. I added it back into the directions. My apologies, and happy baking.
Patti
I love the idea of par baking the crust but have concerns that it will slump/shrink. Generally when I blind bake a crust I fill it with dried beans. This recipe calls for egg wash and, therefore, no weights. And calls for the crust to be trimmed to a “small lip” yet the picture shows what looks to me like more than a small lip. So, my questions are can I crimp the edge as I would normally and how do I keep it from slumping down without weights.
In closing I want to tell you that I love your recipes and your website is my favorite. Other bloggers fill their websites so full of advertisements it’s often hard to navigate through. Thank you so much for your informative and restful website.
Unpeeled
Hi, Patti! That is such a very good observation. (I can tell I am talking to a savvy baker!) The photo was taken before I trimmed the pie dough edges, so it is in fact larger than it will be when baked. As for blind baking with beans, you are right that doing so generally helps with slumping. You can definitely do that: par-bake halfway with beans, then remove, egg wash, and finish par-baking until it looks dry. However, I wanted to make this as simple as possible. I find that chilling the dough for a long time relaxes the gluten enough where there is little shrinkage, and having the lip compensates for any amount of dough that falls down. Also, when the pie dough is filled with the pumpkin custard, you have the opportunity to decorate the edge with leaves, circles, etc. This will compensate for anything that looks less than perfection. I hope this helps, and thank you so very much for your kind words about the website! I do try to make it a nice experience for readers. I will probably run an ad or two in the future to make some money, but I have promised myself NO POP-UP ADS, EVER! I’d rather it look nice. Anyway, thank you again and a very Happy Thanksgiving!
Jean Kennell
Just wondering…you said the new recipe called for sweetened condensed milk. Have you tried that recipe? I’m definitely going to par bake my crust this year….and I do roast my own pumpkin-it’s easy!
Unpeeled
Hi, Jean! I have not tried the new recipe yet, but am going to try this Thanksgiving (if not before) to compare the two. I love my evaporated milk version, I stick with that. But I’m looking forward to testing the new version. What kind of pumpkin do you roast? Do you have to put it through a food mill? I should try it. (Two pumpkin pie resolutions in one Thanksgiving!) Thanks for writing, and when I try the new Libby’s recipe, I’ll let you know!
Taryn
Good tip! I always hated the soggy bottom of a pumpkin pie. This tasted great. My crust sunk a little, but I think it’s because I didn’t chill it long enough.