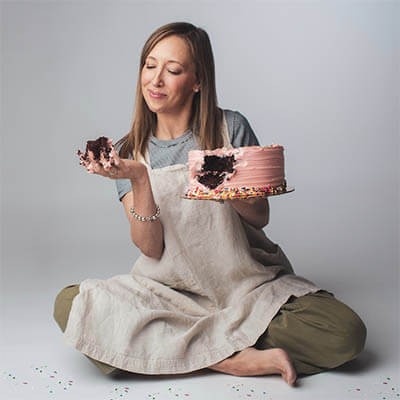
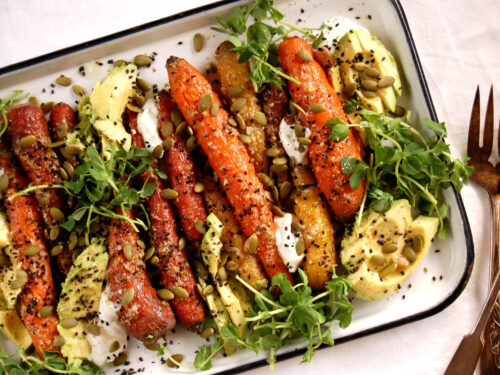
Bullseye! Your best fall dessert ever.
This easy pumpkin swirl cheesecake recipe takes a slightly different approach, with a bullseye pattern that’s magical, fun, and requires a standard cake pan — no complicated springform needed!

How to make this pumpkin swirl cheesecake recipe
This pumpkin cheesecake will definitely earn you one of those “Wow, how did you do that?!” moments. Everyone deserves a little fall fabulousness. I’m finding it in the form of this easy pumpkin swirl cheesecake recipe. I adapted the iconic Maida Heatter’s bullseye cheesecake technique (plus some pastry chef know-how) into pumpkin cheesecake form to create a uniquely beautiful — and dare I say, magical — fall and winter dessert.
If you want a more traditional swirl pattern, no problem. Before baking, just drag a knife or toothpick around the cheesecake filling to create swirls. (Sally’s Baking Addiction has a good pumpkin swirl cheesecake demo of that.)
This pumpkin cheesecake recipe is easy for several reasons:
- You don’t need a springform pan! More on this later, but a regular cake pan will do.
- The recipe is uncomplicated — no special ingredients needed. Plus, creating the bullseye swirl is fun and only looks hard (read: magical). It’s actually quite easy.
- It can be made a couple days in advance of when you want to serve it, so there’s less to do on the big day.

Pumpkin swirl cheesecake ingredients
This pumpkin cheesecake recipe starts with a chocolate wafer crust. You can also sub a buttery graham cracker crust or a gingersnap crust, though I find that gingersnaps are a “love it or hate it” food, and some people will find the flavor too strong.


Jump To:
After the crust, you will make the two cheesecake batters, which is actually more like “one batter, plus.” Why? You’ll make one batch of vanilla cheesecake, and then divide the batter in half, adding pumpkin and spice into one of the portions. That’s it!

The vanilla cheesecake batter is pretty standard. The ingredients are:
- Cream cheese
- Eggs
- Sugar
- Vanilla
- Lemon zest (optional)
- Sour cream
- A little flour
Then, divide the batter in half. In one of the portions, make the pumpkin cheesecake by whisking in:
- 3/4 cup pumpkin purée
- Baking spices: cinnamon, cloves, ginger, and nutmeg

How to make the pumpkin cheesecake swirl pattern: the magic bullseye
Now the fun part. After pre-baking your crust inside a lined, greased cake pan, alternately pour each cheesecake batter into the center, about one cup at a time.
As you alternate the vanilla cheesecake batter and the pumpkin cheesecake batter, you will see concentric circles start to form as the batter spreads. Isn’t it cool?
You can leave a bullseye, or if you’d like, swirl it with a knife or toothpick.
And this classic Libby’s Pumpkin Pie recipe is another creamy pumpkin dessert, and an all-time favorite pumpkin recipe.

How to bake cheesecake in a water bath (and why)
Like most (if not all) custard desserts, you will bake this cheesecake in a water bath, or bain marie.
Place the cheesecake-filled cake pan in a walled, wide casserole pan. Then place it in the oven. Pour warm water into the casserole or baking pan until the water comes halfway up the sides of the ramekins. (I use a teapot for this.)
Baking custard in a bain marie creates a gentle barrier between the direct oven heat and the custard, evening the cooking process and preventing the custard from cracking and going dry on the sides and raw in the middle.

No springform pan for this pumpkin swirl cheesecake recipe!
I assume that I am not the only person in the world who has been turned off or intimidated by the prospect of needing a springform pan to make a cheesecake. Bulky, possibly leaky, and a little complicated, they have always struck me as a little too much annoyance, even a little nerve-wracking — and I say this as a professionally-trained pastry chef!
But in pastry school at the C.I.A., we made cheesecake in regular cake pans. What a revelation! You can use a standard 8-inch or 9-inch cake pan. You’ll fully chill the cheesecake, then invert it as you would with cake, and then put it right-side up again.

Pro tips for using a cake pan and not using a springform pan for cheesecake:
- You’ll want to make sure that the cake pan is parchment lined and well greased.
- Before unmolding the pumpkin cheesecake, heat the bottom of the cake pan on the stove for a few seconds.
- Invert the cheesecake onto a plastic wrap-lined cardboard round or other very flat, plastic-wrapped surface (the bottom of another cake pan works well).
- Immediately invert it right-side up onto a serving platter.

Use Philadelphia cream cheese for your pumpkin swirl cheesecake
I always use Philadelphia-brand cream cheese — for bagels and baking alike. Philadelphia is the standard for true cream cheese flavor and consistency. I find that other brands are good, but just don’t have quite the same creamy, rich tang. I actually don’t even know if Philadelphia cream cheese is based in Philadelphia. But that’s where I am from, so I do feel a pull of regional pride, too!
Regardless of which cream cheese brand you use, use full fat. Cheesecake is made to be rich. But don’t worry about this being heavy. Whipping the batter and the incorporation of other ingredients will lighten the density significantly.
Enjoy this lovely fall and holiday dessert.

Looking for a seasonal fall or winter pumpkin dessert recipe? Check out:
- All-Time Favorite Pumpkin Walnut Bread
- Deep Dish Apple Crisp with Oatmeal Streusel
- How to Make Jiffy Cornbread Mix Better

Pumpkin Swirl Cheesecake, Bullseye Style
Ingredients
For the Chocolate Crust
- 1 1/4 cup chocolate wafer crumbs, from about 6 1/2 ounces chocolate wafers (I use Nabisco Famous Chocolate Wafers)
- 4 tablespoons melted butter
- 2 tablespoons sugar
- 1/4 teaspoon kosher salt (I recommend Diamond Crystal)
For the Pumpkin Swirl Cheesecake Batters
- 1 pound plain cream cheese, room temperature
- 1 cup sugar
- Zest of one lemon, optional
- 1/2 teaspoon kosher salt
- 2 teaspoons vanilla extract
- 1 cup sour cream
- 3 tablespoons all-purpose flour, divided
- 4 large eggs
- 3/4 cup pumpkin purée
- 1/2 teaspoon ground cinnamon
- 1/8 teaspoon ground cloves
- 1/2 teaspoon ground ginger
- 1/2 teaspoon ground nutmeg
Instructions
For the Chocolate Crust
- Preheat the oven to 350°F.
- In the bowl of a food processor, pulse the chocolate wafers with the sugar and salt to crumbs. Add the melted butter and mix until combined.
- Press the chocolate crumb mixture into the bottom of a greased, parchment-lined 8" or 9" cake pan. Bake for 15 minutes. Let cool to room temperature.PRO TIP: I use the flat bottom of a measuring cup or drinking glass to get a flat, even surface of crumbs.
For the Pumpkin Swirl Cheesecake Batters
- When the cookie crust is done, lower the oven temperature to 325°F.
- In the bowl of an electric mixer fitted with the paddle attachment, beat the cream cheese until smooth and fluffy. Add the sugar, zest, salt, vanilla extract, sour cream, and two tablespoons of flour. Beat until smooth. Scrape the bowl. Add the eggs one at a time, mixing well between each. The batter should be smooth and ribbony.
- Divide the batter roughly in half into a separate mixing bowl. To one of the cheesecake batter bowls, add the pumpkin purée, the additional tablespoon of flour, and the baking spices. Beat until smooth and fully incorporated.
Do the Bullseye Swirl, Bake, and Finish
- Now for the fun! Use a 1 cup measuring cup or liquid measure to spoon a cup of pumpkin cheesecake batter into the center of the cake pan. Now, using a different cup, add a cup of the plain cheesecake into the center, right on top of the first cup of batter. Alternate that way until you use all the cheesecake batters. See the concentric rings forming? PRO TIP: Now's a good time to heat a kettle full of water to a simmer.
- Nestle the filled cheesecake cake pan in a standard, high-walled casserole pan wide enough for the cake pan to not touch the sides. Place the casserole into the oven. Now pour hot water into the casserole pan so that the water comes halfway up the sides of the cake pan. That's your water bath.
- Bake for one hour, give or take 5 minutes, until fully set in the middle.
- Let fully cool at room temperature, then place, uncovered, in the fridge until fully chilled, at least 3 hours.
To Unmold the Cheesecake
- Tightly wrap a flat surface (a little wider than the cake pan) in plastic wrap. I use a cardboard cake round or cake pan that's 1 inch larger than the cheesecake.
- Run a knife or small offset spatula around the cheesecake sides. Place the bottom of the cheesecake cake pan over a low burner for about 20 seconds, swirling it constantly on the burner, to release the cold butter in the crust. TIP: Placing the cake pan on the burner is my super quick pro-tip way to release the cold bottom of a cake or cheesecake. Alternatively, set the bottom in warm water for a minute or two.
- Have your serving platter ready. With gusto and purpose, invert the cheesecake onto your plastic-wrapped surface. De-parchment the bottom as necessary. Then, place the serving plate over the upside-down cheesecake and immediately flip the cheesecake right-side up onto the serving platter.Serve plain or topped with fresh whipped cream.
Notes
Nutrition
Disclaimer: Nutrition information is provided for courtesy purposes only, and is an estimate not verified by medical or nutrition experts. Read the full nutrition disclaimer.


9 comments
Gwen Fiori
After removing it from the oven, do you immediately remove it from the water bath or let it cool in the water bath?
Lisa Ruland
Immediately remove it from the water bath–carefully, of course, since it will be hot! I like to use a large, sturdy spatula to get underneath it, and pot holders to grip it. Hope you enjoy.
Cindy
Really good flavor and texture. I swapped gingersnaps for the chocolate wafers and it was delicious! I did carefully follow all instructions exactly as written for the cheesecake, but was unable to get the bullseye, so was very disappointed. The vanilla batter was thinner and pooled over the pumpkin batter instead of sinking in and spreading. The hubs loved this cheesecake so will try again. Any ideas for achieving the bullseye? Thanks!
Unpeeled
So glad that you enjoyed the flavor, but I am so sorry to hear about the bullseye not working out. Hmm…that is very interesting about the bullseye pattern, and I am so sorry that you had that problem. In terms of diagnostics: Was the pumpkin chilled by any chance? Or was the vanilla a much different temperature? I am going to remake this and get back to you. We’ll get to the bottom of it.
L.P.
Made this over the weekend for a small dinner party and of course everyone was WOWED 🙂 Good flavor, fabulous design. Love this!! how could I make it as a chocolate and vanilla?
Unpeeled
Yea!!! I am so glad. Yes, you can definitely make this vanilla/chocolate. Divide the vanilla batter in half. Instead of then taking one half on a pumpkin journey, add 1 1/4 teaspoons SIFTED cocoa powder, and a pinch of instant espresso powder for good measure, if you have it. Stir until it’s all smooth and dissolved into the batter. Proceed as written.
Johanna W.
This was so much fun to make!!! And it tasted wonderful, too, of course! No problem making the bullseye pattern, and I was able to turn the cheesecake out and rightside up again without any issues. I am definitely going to make this for Thanksgiving. Thank you!
Mary
This cheesecake is delicious! My circles, though, weren’t as round as yours. Could I have overmixed the batter?
Unpeeled
Hi, Mary! So glad you enjoyed it. As for the circles, hmm. I don’t think it’s a question of overmixing because I always really beat it well to get some air into the batter. One thing I notice is that any imperfection in the center circle shape as you pour will only expand from there and look all the more dramatic. Next time, try pouring it evenly right in the middle without moving your hand in any direction. That said, I think the beauty of this is that each has its own “personality.” If you look at my overhead shot, you’ll see some imperfections. I consider that part of the charm 🙂 Thanks again for making this, and hope this helps!