Well, butter my biscuits.

In the hierarchy of American comfort food, there is nothing quite like tender, high-rise buttermilk biscuits, still warm from the oven. The kind with so many flaky layers that they split open by hand, waiting to be slathered in fresh butter and jam.
And then there are bad buttermilk biscuits: dry, hard lumps that seem to be a Frankenstein’s monster forged from rock, stale crackers, and paste. Happily, bad biscuits can be someone else’s problem. You are making the good kind.
You may also like: Perfect Pie Dough and Buttermilk Birthday Sprinkle Cake

Three Big Secrets to Good Biscuits
This recipe for high-rise buttermilk biscuits relies on a simple layering technique, and an overall “less is more” approach. The less you work the dough, the flakier and more tender the biscuits will be.
The main things to keep in mind are:
- Use very cold butter. You want small lumps of butter to still be visible in the dough. When the biscuits go in the oven, the butter will melt and cause steam. This buttery steam, in turn, helps produce flaky layers and a higher lift to the biscuits.
- The less you work the dough, the better. The more the dough gets kneaded, folded, patted, and stirred, the more gluten will activate and make things chewy instead of flaky. Luckily, this recipe is for a square biscuit, so there are virtually no extra scraps or wasted dough to re-gather and cut.
- Bake them at a high temperature. A hot 425° oven helps give the biscuits a nice oven spring, or initial rise caused by the reaction to the heat.
- Eat them fresh. Biscuits are best hot right out of the oven. They will go stale quickly.


Best Buttermilk Biscuit Basics
The way to a better biscuit is 10 percent ingredients, and 90 percent technique.
- First, add cold butter to the flour and rub it into the dry ingredients with your fingers until the butter is the size of small peas, but still visible in the flour.
- Then, add the buttermilk and use your fingers to gently stir until it is all just combined. The dough should look shaggy, and not like a smooth ball.
- Turn the dough out onto the countertop. Press it, divide it into sections, stack them, roll or pat them out again, Then cut, egg wash, and bake.
- You can make the biscuit dough in advance and freeze the squares until you want to bake them. No need to thaw first — just pop them right in the preheated oven. They will take around five extra minutes to bake.
PRO TIP: Egg wash adds color and gloss to the top of the biscuits. The egg’s protein, when baked, produces a Maillard reaction, which causes browning. If you don’t want to make an egg wash, just brush a little extra buttermilk on top.
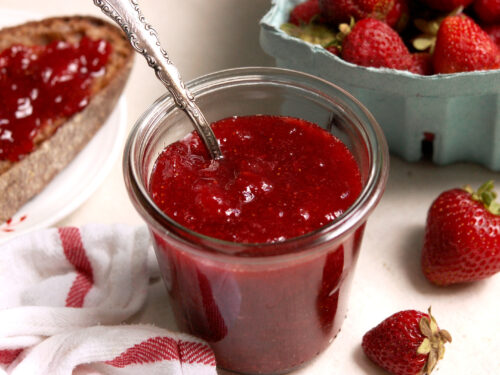
Eat them hot from the oven. And don’t forget butter and strawberry preserves.


High-Rise Buttermilk Biscuits
Ingredients
- 3 cups unbleached, all-purpose flour, plus more for dusting
- 1 rounded teaspoon Kosher salt
- 1 1/2 teaspoons sugar
- 3/4 teaspoon baking soda
- 1 tablespoon baking powder
- 3/4 cup (1 1/2 sticks) cold, unsalted butter, diced
- 1 1/8 cups cold buttermilk
- 1 egg, lightly whisked (optional; this is for the egg wash but you can also just use a little more buttermilk on top of each biscuit)
Instructions
- Preheat the oven to 425°F.
- Whisk the flour, salt, sugar, baking soda, and baking powder together In a large mixing bowl.
- Add the cold, diced butter and work with fingers until the butter is the texture of small peas. The butter does not have to be too combined – there should still be loose flour.
- Add the buttermilk into the flour and butter mixture and mix until the buttermilk has been absorbed. The dough should be shaggy but hold together.PRO TIP: See the Perfect Pie Dough recipe for detailed explanations on how to dice butter, and what a "shaggy" dough looks like.
- Turn the dough out onto a lightly-floured surface. Gather and pat it into a square about 1/2" thick. Divide the square into four equal parts, then stack them on top of one another. Re-pat the dough into another 1/2" thick square. (If things get too sticky, you can lightly dust with more flour.)
- Trim the edges to create a straight border, and divide the dough into 12 biscuits.
- Brush the tops of each biscuit with the egg wash or a little buttermilk, and place them on two baking sheets, leaving at least an inch of space between each biscuit.PRO TIP: If you do not leave enough space between each biscuit, they will rise unevenly and slump.
- Bake for around 20 minutes, or until the bottoms are golden brown.
Disclaimer: Nutrition information is provided for courtesy purposes only, and is an estimate not verified by medical or nutrition experts. Read the full nutrition disclaimer.


23 comments
Jane
I am on a quest to find the best buttermilk biscuit recipe. Yours is in the queue to make today. Just one clarification. By baking sheet do you mean a standard 11×17?
Lisa Ruland
Hi, Jane. Yes, a standard 11 x 17″ half-sheet pan. Hope they turn out well!
amy c
would like to make these (triple batch) in advance for a brunch. how long do you think they would hold in the freezer or fridge prior to baking?
Lisa Ruland
Hi, Amy! They can keep in the freezer for weeks! You have a couple of options here: one is to freeze the cut, raw biscuits and bake them from frozen (they’ll take an extra couple of minutes to bake), or bake and then freeze as soon as they’re cool, and then reheat later in the oven. The first option will give you the freshest result, but a lot depends on how much room you have in your freezer to lay them out individually to freeze on a sheet pan(s) before bagging them together. Let me know if you have any more questions.
Mimi
I hope to make these tomorrow with gluten free flour as I’m coeliac. Xantham gum does not agree with me so I have to avoid it. On the whole most baking recipes turn out well and I welcome suggestions. Thank you for the recipe.
Mimi
Lisa Ruland
Hi, Mimi! Thanks for writing. I was actually diagnosed with a gluten allergy last year, so I am in a similar boat. Sigh. I am glad you’re finding your way to successful baking. I have found that Cup4Cup is a very good gluten-free flour, but it does contain xanthan gum. King Arthur all-purpose flour blend does not contain xanthan gum! Try that. (Though I suspect with your spelling of coeliac you may be in the U.K.? Let me know and I can help you source something there.) Or try making your own blend with this recipe; she’s very good: https://minimalistbaker.com/diy-gluten-free-flour-blend/
Jayne
Great recipe! Do you stack all four divided pieces on top of each other then roll that to 1/2 inch thick?
Unpeeled
Yes, that’s right. That way you build tons of layers when it bakes.
Wend Shade
Best biscuits ever. Mine rose to an inch and a half tall and they are delicious! Thank you so much!
Unpeeled
Excellent! I’m so glad you enjoyed them.
Leslie L Williams
The Best and Biggest biscuits of. All other recipes Ive tried!
Unpeeled
Fantastic! I’m so glad you enjoyed them and appreciate the kind words.
Steph Down Under
Had to leave a comment, made these twice in a few days. There are AMAZING thank you!!! Yum! For almost a decade I have used James Beard’s buttermilk biscuits…I felt like a traitor trying these….but now I can’t go back to him! Lol! And I made your banana muffins two days ago, I don’t even usually eat banana bread and I loved them. You’re my first “go to” now for everything! Thank you!
Unpeeled
Hi, Steph! I am so glad you enjoyed the recipes, and you have absolutely made my day with these lovely comments. There’s nothing better than a warm, flaky buttermilk biscuit in my book! Except maybe banana bread 🙂 I hope you keep enjoying, and thank you again so much.
Lindsay MacNeil
Amazing ? crisp,flaky,easy and delicious! This will be my new tbiscuit recipe! Thank you!
Unpeeled
Excellent! So glad you liked the recipe. I love a good biscuit, especially hot from the oven.
Wn SH
BEST biscuit recipe ever and I have tried so many looking for the perfect high rise yet flavorful biscuit.
Unpeeled
Fantastic!! Thank you.
Carla
Mine didn’t raise up very tall ?? Maybe they needed to be thicker than 1/2 inch? The picture they look thicker raw.
Unpeeled
Hmmm…yes, maybe so. Also check the age of your baking powder. I find that I need to replace mine well in advance of the expiration date. But you can certainly make them a little thicker.