Treat yourself like royalty. This authentic English scones recipe, the royal recipe enjoyed by the King of England at Buckingham Palace, is delicious. This recipe bakes up a batch of buttery, tender, just-sweet-enough scones. Serve with jam and clotted cream or butter, along with a cup of tea. Below, learn how to make scones, what to serve with them, and check out a step-by-step video.

Jump To:
The King’s Own English Scones Recipe
The only thing better than a good cup of tea is a good cup of tea paired with a perfect scone. And if you are going to bake scones, why not bake the very best? In case you are not invited to royal tea at the palace when you are next in London, you now have this very official, very royal, best English scones recipe.
These are British scones, which are different from an American scone. Traditional British scones use less butter, and have a round shape.

How We Know the Palace’s English Scone Recipe
In May 2020, perhaps because we all needed a bright spring boost to our Covid lockdowns, the Palace released the recipe for the official English tea scones enjoyed by the royal family and its guests. They even did an instagram video about it. According to the palace:
Every year at Garden Parties across The Royal Residences, over 27,000 cups of tea, 20,000 sandwiches and 20,000 slices of cakes are consumed! The Royal Pastry Chefs are happy to share their recipe for fruit scones, which traditionally would be served at Buckingham Palace every summer.
How to Make English Scones
The Buckingham Palace royal scones recipe is surprisingly basic. To make this classic buttermilk English tea scone, you will need basic baking ingredients you likely already have on hand, and simple equipment. Round cutters are the only “specialized” tool you will need, easily purchased online or at any good kitchen shop.
Step-by-Step Video
Here’s a helpful video that takes you through how to make this English scones recipe. After that, you’ll see the ingredients and written steps.
Scone Recipe Ingredients
The recipe makes simple buttermilk scone with butter and leavening, folded with sultanas. “Sultanas” are British for golden raisins, FYI. These best scones are just as good without raisins, in case fruit scones are not to your taste. You could also divide the recipe into both types. (And feel free to substitute the sultanas for blueberries or chocolate chips, though that is less traditional.)
To make these scones, you will need the following ingredients:
- All-purpose flour
- Baking powder
- Salt
- Butter
- Sugar
- Large eggs
- Buttermilk
- Sultanas or golden raisins (optional)

Instructions for Making English Scones
More thorough instructions are in the recipe card, but here is the general outline:
- Mix the dry ingredients (flour, baking powder, and pinch of salt) with the cold, cubed butter and sugar in a large bowl. Work the butter into the dough a bit, until the texture resembles large peas in sand.
- Whisk two large eggs and the buttermilk together in a small mixing bowl. Stir the liquids into the buttery crumb flour mixture. Add the raisins, if using, and mix until evenly distributed and smooth. Flatten the scone batter dough to a 1” thickness and cover. Wrap and let rest for 30 to 45 minutes in the refrigerator.
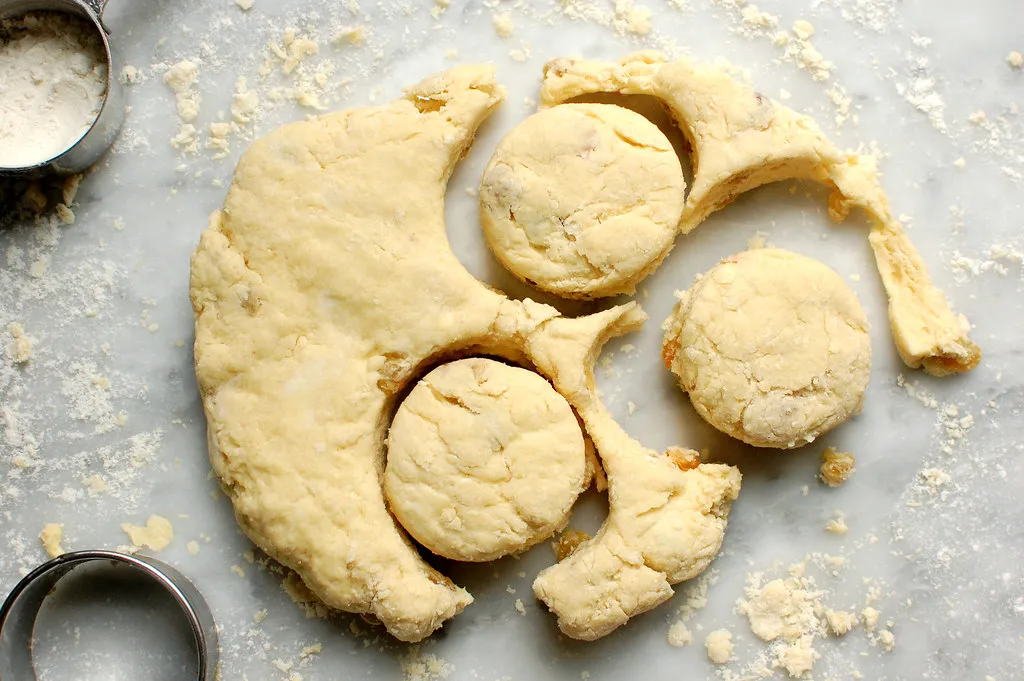
- Turn the scone dough onto a lightly-floured surface. Cut to the desired shape using a round biscuit cutter. I prefer a 2-inch cutter, which is the standard width for tea scones. Cover and rest the scones for another 20 minutes in the fridge.
- Preheat the oven to 400°F. Egg wash the top of the scones with the third egg. Bake on a baking sheet lightly greased or lined with parchment paper for around 12 to 15 minutes, until light golden brown. Transfer the baked scones to a wire rack to cool.
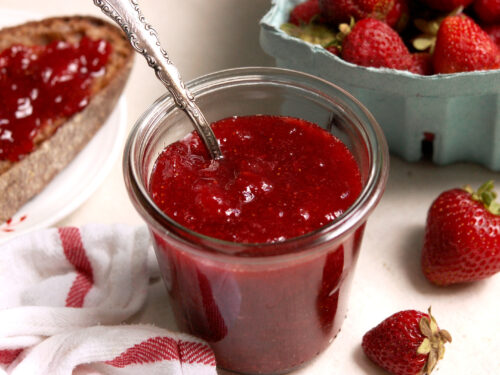
- Serve your English tea scones very fresh, warm or at room temperature, with clotted cream and homemade strawberry preserves: three ingredients, 20 minutes, and infinitely better than anything from a jar.

Baking Tips for Making the King’s English Scone Recipe
There are good scones, and there are great scones. A scone fit for royalty (and thus, us) should be:
- Tender, not tough or bready
- Moist, not dry or crumbly
- Not too sweet, and
- Hold together well and not fall apart when you spread jam and clotted cream on top

My Best Baking Tips and Techniques for Perfect Scones
To check all these boxes, you need a good recipe (check!) and the right technique. Here are the secrets to making good scones — what to do, and what not to do, technique-wise.
- DO NOT over-mix the scone dough. Kneading the dough too much will make it tough and bready because it develops gluten. As soon as the scone dough looks smooth, stop.
- DO check your bake. The scone bottoms will look light golden brown and feel hollow when tapped. Because of their small size, scones over-bake and become dry easily, so be sure to get it right.
- If using the golden raisins, soak them in warm water for at least 20 minutes, then drain before adding to the dough. This prevents them from absorbing moisture from the scone dough.
- The prep time is not much. The total time adds up, though, because it is imperative to rest the dough to relax the gluten. This will keep the baked scones nice and tender.

What to Eat with English Scones
Most importantly, enjoy your royal best English scones with, what else? A lovely hot cuppa English tea. Serve with fresh jam such as homemade strawberry preserves, and some clotted cream.
If you’re pulling together an afternoon tea, you should also get the recipes for English cucumber sandwiches and smoked salmon sandwiches. Afternoon tea never felt so special.

You will also love these British-inspired recipes:
This recipe was originally published in April 2023, and updated April 2025.

Traditional English Scones (Official Buckingham Palace Recipe)
Ingredients
- 3 1/2 cups all-purpose flour (500g)
- 2 tablespoons plus 1 teaspoon baking powder (24g)
- Pinch of salt
- 7 tablespoons cold, unsalted butter, cut into small pieces (94g)
- 1/2 cup sugar (86g)
- 3 eggs (2 for the dough, 1 for egg wash)
- 3/4 cup buttermilk, less 1 tablespoon (175ml)
- 2/3 cup sultanas or golden raisins, optional (100g)
Instructions
- If using, soak the raisins or sultanas in hot water for 20 to 30 minutes. Drain before adding to the recipe.PRO TIP: Why soak the raisins? One, soaking softens the dried fruit, which tastes better in the finished recipe than a hard, tough little raisin. Second, it helps keep the scone dough moist. Raisins (sultanas) naturally want to rehydrate. By letting them soften I water, the hard raisins pull moisture from water, not the scone dough.
- Mix the flour, baking powder, pinch of salt, and sugar together in a large mixing bowl. Add the butter and work it into the dry ingredients with your hands until crumbly, like the texture of large peas in sand.
- In a separate small mixing bowl, whisk two eggs and the buttermilk together. Stir the egg mixture into the butter and flour. Add the raisins, if using, and mix until evenly distributed. Continue to gently knead the dough by hand just until barely smooth. PRO TIP: Do not overmix or knead the scones, as this could make the scones a bit tough and bready, instead of tender.
- Remove the dough from the bowl onto a clean countertop lightly dusted with flour. Lightly dust the top of the scones with flour. Flatten the dough to a 1” thickness and cover. Rest for 30 to 45 minutes in the refrigerator. Resting the dough allows the gluten to relax. This helps achieve a tender, flaky scone. PRO TIP: You could simply use the palm of your hand to flatten the dough. But I suggest a rolling pin for a more even result. Roll from the center out, and rotate the dough as you go to prevent sticking.
- Remove the scone dough from the refrigerator and cut to the desired shape using a round biscuit cutter. Place the scones onto a baking sheet greased or lined with parchment paper. Chill for an additional 20 minutes, covered.Note: I use standard 2-inch and 2 1/4-inch round cutters. The original recipe did not specify, but this is standard. If you use a 2-inch cutter, I suggest making the height a little shorter.
- Preheat the oven to 400°F (205°C). Whisk the third egg and gently brush the egg wash onto the top of the scones with a pastry brush.PRO TIP: If you do not have a pastry brush, just use your fingers.
- Arrange the unbaked scones on a parchment-lined or greased baking sheets, leaving at least 1 1/2" of space between each scone. Bake for around 12 to 15 minutes, give or take depending on your cutter size, or until light golden brown. Cool on a wire rack for a few minutes, then serve warm or at room temperature with jam and clotted cream.PRO TIP: These will bake best if you bake them one sheet at a time, or at least rotate the baking sheets top to bottom, front to back halfway. If you have a convection setting on your oven, adjust the temperature to 375°F (190°C) and bake for about 10 to 12 minutes.
Video
Notes
A Quicker Method
This best English scones recipe was adapted very carefully from the official Buckingham Palace recipe for tea scones. That said, if you would like to simplify things a bit, my effort-saving trick here is to roll the scones out and cut them with the biscuit cutter at the same time, instead of two separate chillings. Place the scones on prepared baking sheets, cover, then let them rest in the fridge for a full hour to hour and a half. Then just egg wash them and pop them in the oven.Making the Scones in Advance
These English scones can be rolled, cut, and frozen in advance in an airtight container, such as a freezer bag. Just freeze the scones on a baking sheet first before putting the scones in the airtight container into the freezer, so they keep their shape and don’t smush. You can bake frozen scones exactly as you would chilled scones, directly from frozen. They may just take an additional minute to bake.Notes on Adapting the Royal English Tea Scones Recipe
The original recipe, as written, was very vague on some small points, and definitely presumes a certain level of baking experience. So I have added a bit more detail, and converted this English scone recipe to American-friendly volume measurements from metric. But other than adding a smidge more buttermilk because the original recipe seemed a little dry, the recipe and technique is exactly the same, and you’ll be able to enjoy a lovely cream tea. Additionally, I am fairly certain that the original recipe was written for a convection oven, which would be normal in a professional kitchen. The temperature, as written, was way too low for a standard oven for the amount of time listed. So I have adjusted the temperature and time for a conventional oven, not convection.Nutrition
Disclaimer: Nutrition information is provided for courtesy purposes only, and is an estimate not verified by medical or nutrition experts. Read the full nutrition disclaimer.


112 comments
Jane
I can’t get to the store. Would this work if I made my own buttermilk?
Lisa Ruland
Absolutely! Making your own buttermilk would work perfectly well, and is easy to do. Just place 1 tablespoon of white vinegar into 1 cup of regular whole milk. Stir and let it sit for 5 to 10 minutes at room temperature until the milk slightly curdles and thickens.
Anne
Hi, in the list of ingredients it says to separate the eggs, but the instructions don’t say which part of the egg to use. Should I use the egg white for the egg wash?
Lisa Ruland
Hi, Anne! Thanks for the great question. Two of the eggs go into the scone dough, and the third egg is used as an egg wash for the tops before baking. There’s no need to separate the eggs.
Helen
Someone already asked you why separate the eggs which is on the recipe card when this is not noted in your instructions. Although the scones are delicious and I appreciate the cup measurements it would be best if you update your recipe card. I’m sure others will be like me wondering why you’d note separate the eggs when it’s not needed. I just spent ten minutes reading and rereading your instructions and recipe card to see at one point I’d use the yolks and at what point I’d use the Albion. Then read the comments and found your response to someone else puzzled by the separated eggs instructions. Frustrating.
Lisa Ruland
Ah. I think that saying “eggs, divided” took people to mean “separate the yolks and whites.” I have updated to recipe for clarification, and thank you so much!
Erin
Delicious!
Lisa Ruland
So glad you liked them, Erin! Thanks!
ROSILYN
Hi, in a traditional US oven, do you place in middle or top layer?
Lisa Ruland
Hi, Rosilyn. You would use the middle rack of the oven.
Ricki
I love this recipe, the scones are delicious, Thankyou
Samanth
Hi! I have made this recipe so many times and I absolutely love it! I wanted to make the dough and freeze the cut scones in advance. How long would you say I can freeze them for?
Lisa Ruland
Thanks for the note, Samantha! Glad you enjoy them. You can freeze the dough for up to three months as long as they’re stored airtight.
Ricci Ann
These are excellent! I just made them & am so happy with how they turned out! I made some changes, as I have celiac disease & need to eat gluten free. I used King Arthur cup-for-cup gf flour & it worked perfectly. Only thing I did differently was the 2 rests in the refrigerator, since no gluten was relaxing in my batch! I just did one rest before baking. They’re moist yet crumbly, & remind me so much of the ones I had at Buckingham Palace last year on a tour!
Lisa Ruland
Hi, Ricci Ann! I am so glad you enjoyed them! King Arthur makes a great, go-to GF flour, so it’s wonderful that you were able to adapt them so well. Thanks for the note.
Tracy
Tried to make this yesterday morning. Want to trouble shoot here. I followed the recipe to a T and measured everything.
Dough was definitely too sticky and stuck to the board and the scones had a bit of an aftertaste (bitter?) any ideas what happened?
Lisa Ruland
Hi, Tracy. Hmm…sorry to hear you didn’t have total success here. That must have been so frustrating. It sounds like some more dusting flour was needed on the board and dough for rolling and cutting. The dough can be a little sticky otherwise. As for the bitter aftertaste, that sounds like too much baking powder to me. Did they rise normally, or were they very puffy? I could see how not adding the correct amount of flour would both make the dough too sticky AND increase the ratio of baking powder, which explains everything. But you said that you measured everything correctly. I suggest increasing the flour by 1/4 cup, and reducing the baking powder by 1 teaspoon.
Janet
The listed temperature 350° F, was lower than the 400 F. I’m used to using for scones. I did use it, and it took forever to bake and resulted in heavy cake like biscuits. It actually translates a 392°F. Please correct your recipe.
Lisa Ruland
Dear Janet, thank you for your comment. I do not believe the recipe needs correcting. Here’s why: 350 F definitely is too low a temperature to bake scones — you’re right about that! If you read my recipe card, the recipe calls for baking the scones at 400F degrees, or 375F if using a convection oven. I think you may have baked your scones too low, perhaps based on the temperature given on the Palace’s website (?), which is written for a commercial convection oven. I took care to “translate” the Celsius/convection oven recipe into Fahrenheit and non-convection home ovens. Further, I checked and 392F equals 200C. The 180C listed in the Palace’s recipe translates to 356F, which we can round down to 350F since this is a standard baking temperature. But again, this would be a convection temperature for baking. A conventional home oven needs a hotter temperature setting, hence 400F. Finally, even if the correct temperature translation from 180C is 392F (it is not), I could never ask a home baker to bake something at such a tricky temperature! The adjusted temperature and time should work as written. Please let me know if you have any additional questions about this; I’d love to help you get it right.
Victoria
Such a wonderfully well done recipe. My standard scone recipe. Thank you!
Lisa Ruland
Thank you, Victoria! I appreciate the kind words, and am so glad you enjoyed them.